Tag Archives: web applications

The Importance of Page Loading Time

run_blur

Customers are very fickle when checking out a company’s web site.  Unless they’re desperate, a person browsing a site tend to go quickly from one page to another.  Their attention span is short.  Their time is valuable.  They don’t want to spend too much time waiting for a web page to load.

Companies have spent a substantial amount of money to improve page loading times.  Improvements include upgrading internet connectivity, buying faster computers, reducing web applications RAM usage footprint, or investing on a content delivery network.

What other important reasons to improve web performance?

  • Increase in traffic due to natural business growth, or advertising campaigns.
  • Snappy response times are required when using the latest web browser tools, such as AJAX.
  • Google is planning to rank web pages by their load times.
  • Increase use of videos using embedded Flash, and future HTML5.

There is a cheaper way to improve web site performance: Optimize Content.  It means reducing the use of heavy graphics, Flash files, or client side Javascripts.  It also means reducing HTML and CSS file sizes.  It may seem contradictory, but ultimately, content dictates page loading times and can improve the web browsing experience.

Custom 404 Page Using JBOSS

Missing PuzzleHaving a custom “page not found”, or 404 page, is an important modification for any website.  It’s used to enhance the user experience by presenting an easy to understand message.
Setting up a user friendly error page is simple enough using Apache web server.  Just modify the line in httpd.conf and point it to a static HTML document:

ErrorDocument 404 /the404_page.html

With JBOSS (or Tomcat-like Java container) application server, it’s slightly trickier.  It has to be handled per web application basis.  The change is done on the web.xml file, with these entries:

<web-app>

<error-page>
<error-code>404</error-code>
<location>/the404_page.html</location>
</error-page>

</web-app>

For the root directory, modify the web.xml in the ./deploy/jboss-web.deployer/ROOT.war/WEB-INF directory.

Testing this setup in Firefox and Opera, the custom 404 page will automatically show up properly.

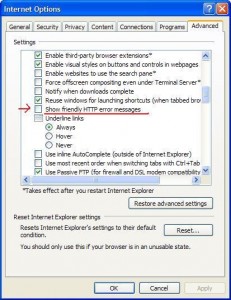
However, with Internet Explorer, a “The Webpage Cannot Be Found” message comes up instead.  This is a feature of IE to show Microsoft’s version of a “friendlier error message”.  In this case, we want to disable it, so the custom 404 page will show up.  It can be done via Internet Options -> Advanced tab :

Option in IE to Supress Custom 404 Error Page

Update: Microsoft Help & Support site states if the 404 error page is greater than 512 bytes, then IE will not show the friendly message.  So the page size must be a bigger one, not just a simple one liner.

Now that the applications are setup to serve up custom error page, here are some examples of beautiful 404 page designs to improve the user experience.

Setting Up Apache Web Server With Secure HTTP

Incorporating the use of Secure Socket Layer (SSL) library is straight forward with Apache web server.  This is the library I always use for all of my Apache web servers installations.  From one robust open source software to another, they’re a perfect fit.  They make deployment quick and easy.  Here’s are the steps for Apache HTTP and OpenSSL:

Compilation

Assuming the OpenSSL installation in /usr/local/ssl, the Apache web server source code compilation will require the configure option:

–enable-ssl –with-ssl=/usr/local/ssl

I use the following:

./configure –prefix=/usr/local/apache2 -enable-ssl –with-ssl=/usr/local/ssl

Then just run:

make install

On Unix platforms like Solaris and Linux, the configure and compilation should work without a hitch.

Configuration

Go to the configuration directory and edit the httpd.conf file (in my example /usr/local/apache2/conf) and uncomment this line:

include conf/extra/httpd-ssl.conf

Then proceed to the /usr/local/apache2/conf/extra directory and edit the httpd-ssl.conf:

  1. Specify the machine’s IP address to “listen” on port 443.  Specifying an IP address is useful if the machine has multi-homed (multiple IPs configured).
  2. Ensure the Signed SSL Certificate is on this machine.  Store it in /usr/local/apache2/conf/www.website.com.cert pathname.  It can be anywhere that’s accessible from the web server level.
  3. The SSL key for the host needs to be available also, and stored in the same /usr/local/apache2/conf directory.
  4. For the <VirtualHost> tags, edit the _default_ with the IP address, and may look something like this:

<VirtualHost IPAddressNum:443>

ServerName www.website.com

SSLEngine On

SSLCipherSuite ALL:!ADH:!EXPORT56:RC4+RSA:+HIGH:+MEDIUM:+LOW:+SSLv2:+EXP:+eNULL

SSLCertificateFile “/usr/local/apache2/conf/www.website.com.cert”
SSLCertificateKeyFile “/usr/local/apache2/conf/www.website.com.key”

<FilesMatch “\.(cgi|shtml|phtml|php)$”>
SSLOptions +StdEnvVars
</FilesMatch>

<Directory “/usr/local/apache2/cgi-bin”>
SSLOptions +StdEnvVars
</Directory>

BrowserMatch “.*MSIE.*” \
nokeepalive ssl-unclean-shutdown \
downgrade-1.0 force-response-1.0

CustomLog “/usr/local/apache2/logs/ssl_request_log” “%t %h %{SSL_PROTOCOL}x %{SSL_CIPHER}x \”%r\” %b”

</VirtualHost>

References

Further options and settings for SSL are available from the Apache.org site: